Thursday, July 18, 2013

Fun with Wood

One of the themes in the exchange group one month was “wood”, had to produce an ornament which was wooden or used wood.  I took a couple of the wooden turned eggs which you can find at craft stores and used finger nail polish to create my ornament.  The polish produced a shiny enamel coating.  Using pieces of painter’s tape I created resist strips and applied several coating of the polish. 


I also used additional wood turnings to create wooden drops, again using nail polish as the coloring medium.

Have thought about doing more with the polish, but have not gotten around to it yet.

Tuesday, July 16, 2013

Getting closer to returning to making ornaments.

Have been slammed at work.  I have had to do my regular job plus pulling together and producing the updated corporate catalogue.  When I asked earlier this year if I needed to start planning the catalogue out, I was told that it would be out-sourced to a local company and wouldn’t have to worry about it.  On June 26th, I was handed the initial design of the catalogue and was told that I would need to do it because the company was not able.  They would still be doing the printing.  With a few days for vacation and holiday, I began work on July 8th and was ready to printing a couple of galleys on July 12th, worked 45+ hours.  So I have been frantically producing said catalogue with only a few photos left to take to update product look.  I was able to go from a 32-page to a 28-page piece, have galleys produced for editing.  Have three photos and one product description to do (with place-markers holding position) then I hope I can be finished with the catalogue and I can send my creative juices back to Christmas ornaments.  Have several ideas forming for some regular sized, some miniatures.  I also have several branches made for the proto-type of the German-style feather tree, need to take photos and make more branches.

Monday, July 8, 2013

Update 2013/07/08

Have had to work on other items recently and not had a chance to create any ornaments, but that hasn’t stopped my brain from imagining.  Was up until the wee hours of the morning doing “What if I did this?” and the “I wonder if this would work?”  Which is usually how it works but when the first alarm goes off at 5am, it makes for a long morning.

During the ‘vacation’/holiday I did purchase several items for not only miniatures but also full sized ornaments.  I also have been looking at a couple of sites which I want to try and incorporate their techniques into my Christmas ornaments, but those will be a couple years away.  The next ornament will be for friends who got married several months ago.  They are expecting their first-born sometime this month and I have two gifts for them.  The first are two 6mm square cut rubies, the second will be a light blue ornament with ‘2013' date tag. 

My god-daughter still hasn’t decided which ornament she wants to do for her Senior Project.  She told me she wanted to do hand-made ornaments but didn’t think there was enough information for her literature review.  I chuckled and told her I had more than enough information and reference books to satisfy her teacher.  I’m trying to get her interested in the Cracker Box ornament kits for several reasons.  The first being that I can hopefully help her long-distance when she has questions, so she can work on it when I’m not in North Carolina.  The second reason, I have always wanted to do them since I first found out about them in the late 70s.  I thought I would let her pick an ornament and then, I would order 2 so that both of us do them on different colored balls.  I told her that if she liked doing them, I would buy her a couple more.  She has told me she wants to learn to make some of my ornaments and while I am flattered, I think she may just want to be able to raid my ornaments and pass them off as her own work.  In the past, when I have helped her on school projects, she would take my beginning of the work and then turn it in, receive a good grade and then fail to complete the assignment.  I have told her that she HAS to do the work, I would help her, but I wouldn’t do it for her.  Six years ago I helped her older brother with his senior project, but he did do 98% of the work.  His project was Gem-Stone faceting and I would start the tier and let him finish.  He was a quick study and he picked-up the operations fairly quickly.  Only when a new procedure such as transferring and re-aligning the stone from working on the bottom to beginning to work on the crown was help required.

I purchased the Cracker Box catalogue and on my last visit to NC told her to look through it to find a simple one.  Everyone she looked at, I felt daunted at the complexity, thinking I would find it challenging and completely overwhelming for a 17 year-old who has never done anything like them.  I may go ahead and order a couple so that when I go to NC later this summer I can give her an ornament to work on (and I can go ahead and order a couple for me).

Wednesday, June 26, 2013

"Plastics....There's a great future in plastics." The Graduate (1967)

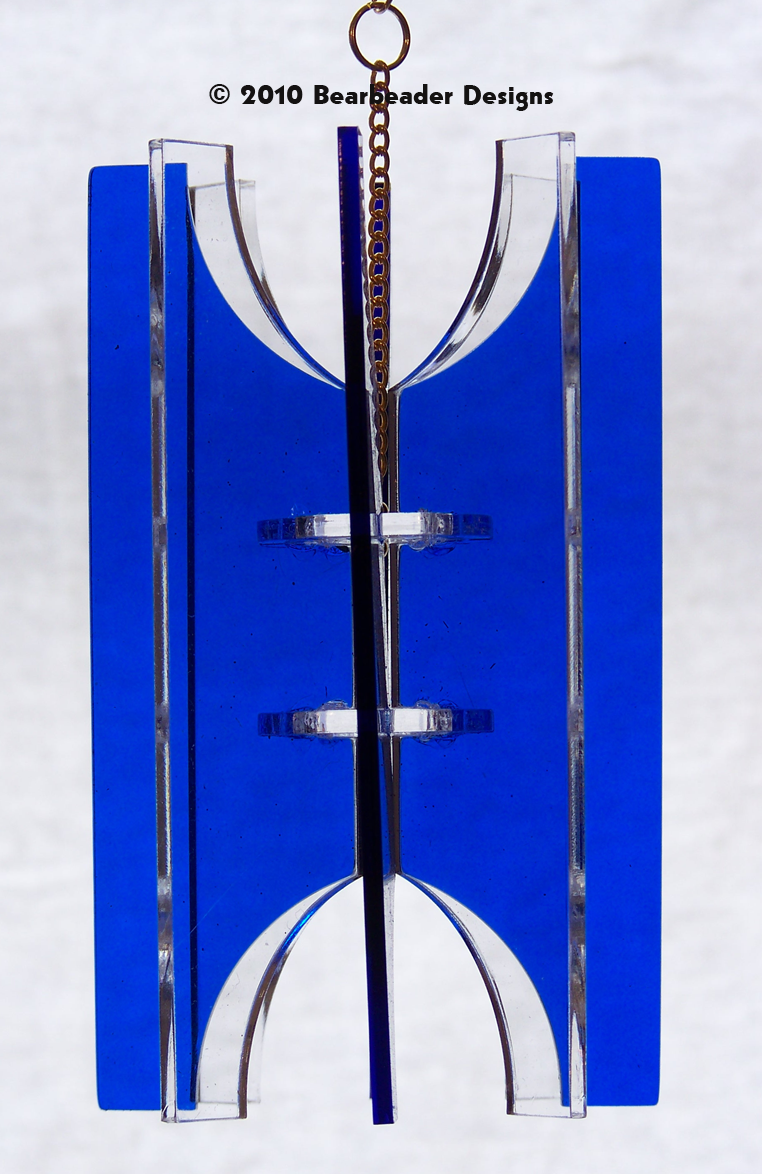
Back in the January 2010, I started designing some new ornaments.  A friend’s company had purchased an industrial laser, and having had access in the past to one, I knew what it could be used for.  I had seen lots of 3-dimensional ornaments made with wood, paper, fabric and glass which had been joined together.  We had talked about the possibilities and I had even gone so far as going through the drops looking at the different types of materials I could get out of their recycling bins.  During January and February I designed over 24 ornaments which I called “vaned” ornaments.  The ornament would be made up of 6 or 8 vanes which were secured around two cogs with either 6 or 8 cut-outs.  The vanes would be notched as well so alignment would be fairly easy.


Mainly geometric shapes: globes, penta-, hexa-, octo-gons, with a couple of star shapes and ovids, all designed around a central axis.  There were several ‘fanciful’ shapes as well.  After converting to the laser CAD program and cleaning the designs on any extraneous lines, the parts were cut and I received 2 heavy boxes with roughly 16 of each design in clear and translucent blue, then a couple months later, I received a couple more boxes with parts cut in opaque orange, white, ‘glo-edge’ yellow and opaque yellow.


The ornaments are somewhat cost-prohibitive as the laser time itself is measured in seconds.  The cost to cut an ornament is more than the acrylic used.  Although I did receive enough parts that I will have a nice collection of modern ornaments.  As long as I don’t request too often, my friend said he would cut more for me when they are not using the laser even to the point of allowing me to run the machine to cut more as long as I also help with their product (which I have done in the past).  The initial boxes are still being used and I have unique ornaments for several friends.  One a year in a color combination, after several years a collection on the tree.

Tuesday, June 25, 2013

Earrings or Ornaments?

When looking for ornaments to go on a tree, I had created ornaments which have been inspired by jewelry.  There are times when I have purchased pieces of jewelry to use as ornaments.  A crystal necklace can be used as a swag between branches, or ‘floating’ pearl necklaces linked together with chain can create a garland.  More than once I have used large shiny, dangly earrings as ornaments.  The miniature tree can easily be decorated with earrings, especially these with french-hooks instead of posts or clip-ons.

When I belonged to a group where miniature ornaments would be exchanged, many months I fell back on my years of making costume jewelry and made ornaments which could easily be worn as earrings if you had a pair and a couple of french-hook style ear wires.


 Some are made from an earring base such as these larger  ornaments.  Using Delicas® as spacer beads, I was able to fill the space between the chain lengths and the faceted glass beads.  With the wide variety of glass colors, the combinations were almost endless.

The drawback to these being earrings are the weight.  These ornaments were easily 2 to 3 ounces, which most people think is very little weight until they are hung from a single thin wire and have a tendency to swing when you walk and smack your head when you turn your too quickly.


Others are made from a mixture of bead caps and earring findings.  This group of 5 are all under 2.5" in height.  And are limited only to the colors of the accent beads or the finish of the findings themselves.


Monday, June 24, 2013

Designing with constraints

One of the exchange groups I belonged to would send out an item which everyone who choose to participate had to use in making an ornament.  I enjoyed these challenges as there were times I would never had used the item(s).  I had in the past done similar challenges in jewelry where everyone would receive a bag of beads which had to be used.  The first came in the school year of 1977-8, when Rezunit® came out with the cone shaped air freshener.  They had a national contest open to high school students to use the cone to create something “Christmassy”.  The design which I submitted was turned the cone into a tree but using seeds, pods and spices.  The final piece had anise stars, cloves, cinnamon bark, sweet-gum balls, cardamom and cumin seeds.  Various shades of browns, but smelled of cookies and pies.  It took First Place.  Being limited to what you can and cannot use can be liberating, forcing you to think outside the normal,

In 2012, one of the challenges was to create and ornament using a compact disc.  I thought several days when I was looking through a scroll saw magazine and found some scroll saw ornaments.  Using one of the patterns as inspiration I called a friend and asked if I could send him a design to cut on his industrial laser.  I knew I wanted to ‘sandwich’ a piece of color between 2 CDs to create a ‘stained-glass window’.  After cutting the surface, I turned the next CD over to cut from the reverse.  I cut several pieces as I wasn’t sure how the final piece would look.
Two CDs are glued together with a piece of red lighting film sandwiched between.  To continue with the dilver reflectiveness, a silver-toned chain and jump-ring were used as a hanger.

Thursday, June 20, 2013

Another media is heard from

I have worked primarily with beads, but other media has been used to create ornaments as well.  I have created several 3-dimensional designs from plastic canvas.  Being able to customize the ornament by changing the fibre can change not only the color but the texture of the finished product.  I enjoy working with plastic canvas for its ability to hold its shape and the variety of stitches which can be incorporated into the design.  So far I have been using a simply cross-stitch for most of the ornaments.  The last ornament was done in pink and purple and was constructed from three squares of plastic canvas.  I have also done the same shape but in a fleur-de-lis pattern.


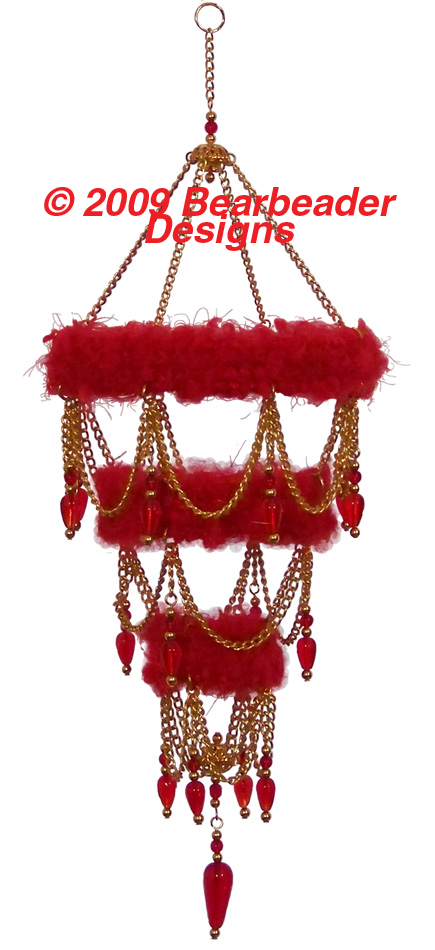
I have also used rings of the plastic canvas to create chandeliers.  The first was completed in the late 1990s using fringe, 3 concentric rings of plastic canvas, chain, a bead cap and trim to hide the stitches.  One month the theme in the exchange group was fuzzy, so I used eye-lash yarn to create an ornament.  I always create 2 copies of the ornament for exchanges so I can send one to my partner and can keep one for myself.  I decided to “gild the lily” for mine by adding chain and beaded drops.


October 2011 the theme was “Pink” in honoring “Breast Cancer Awareness Month” and that month I used plastic canvas to create an “Awareness Ribbon” ornament, as well as the miniature for the month.